Lesson 3: Habitats and Communities
Objectives
- The students will understand how living things are interconnected.
- The students will understand what a habitat is.
- The students will identify communities of plants and animals.
Background
A habitat is the place where plants and animals normally live. Some habitats have lots of plants and animals, some do not. Some habitats are near water, some are on top of mountains. Each habitat often has a different mixture of species living there. The group of plants and animals living in a habitat is called a community.
Vocabulary
- Habitat: the place where an animal or plant normally lives
- Community: the group of plants and animals living in a habitat
Procedure
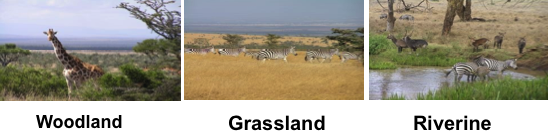
1. Using the cards previously made in Unit 1 Lessons 1 and 2, ask students to group the types of plants that they found together in their outdoor explorations. Explain that each grouping represents a habitat. It is usually named for the major type of plants it contains, and it contains the water, food, and shelter an animal needs to survive. Habitats in Kenya may include:
• Open field or grassland
• Woodland or scrub
• Parkland, a mixture of the two
• Kopje, a rocky outcropping with sparse vegetation
• Riverine, through which a river flows
2. Next, have them place animal cards in each habitat where they were seen.
3. Ask if there are connections between the plants and the animals. For example, which plants did they see animals eating? Were the animals using plants for other purposes (shade, perching, nests)? Point out that sometimes plants and animals help each other; sometimes they harm each other. For example, some plants need animals for pollination. And animals can help disperse seeds. But some plants have thorns to protect themselves from being eaten by animals. Many animals are herbivores and only eat plants. Which ones?
4. Have students draw pictures of the different habitats with the plants and animals found there.
5. Have students describe the habitat in which they themselves live. What do they need to survive? Have children draw a picture of their habitat.
Questions For Discussion
- What is a habitat? Can you name a habitat and tell what plants and animals you would find there?
- Are some animals found in different habitats? Why?
- What are some similarities and differences between human and animal habitats?
Extended Activities
1. Animals and Habitats Matching Game
Divide students into groups of four. Using the cards that the students have drawn, mix together a set of animal cards and a set of habitat cards. Lay them out upside down. One child chooses two cards and turns them over right where they are. If they match, that is, the animal would be found in that habitat, the student keeps the cards and gets another turn. If they don’t match, the student turns them back over in their places, and the next student takes a turn. When all the cards have been matched, the student with the most pairs wins the game.
2. Habitats and Communities Game
Using the cards that the students have drawn, have each child choose one picture of a plant or animal they would like to be. First have them construct habitats, by holding their cards and moving around the area. Then add the animals to make communities. Some animals could be in more than one habitat; does this confuse the students? An animal may spend some time feeding on grass, then walk to trees for shade. What if they eat all the good grass in an area?
3. Mouse in the Grass
Time: 30 minutes
Materials: Large piece of paper, Marker
Setting: Outdoors, with space to run
Key Words: Habitat, Population, Limiting Resources
Background:
In a complex ecosystem, nothing exists in its own bubble. Plants and animals are,interconnected, and changes in the population of one can have profound impacts on the rest.
Many factors can influence an organism’s population, including changes in weather, predator abundance, disease, pollution and habitat destruction. A habitat is a place where an organism lives, that provides the resources it needs to survive. Animals depend on their habitat to find food, water, and shelter to hide from predators and raise their young. In Laikipia, one of the most prevalent habitats is grassland or savannah. In this activity, we look at how one important grassland species, the spiny mouse, interacts with its environment over time, and how the availability of resources affects its population.
Doing the Activity
1. Introduce the activity. Explain that much of Laikipia is covered in grassland; it’s a very important ecosystem. Ask students to think of some things that make up a grassland ecosystem. There are, of course, native grasses, as well as different types of trees; large animals like gazelles, zebras and giraffe; small animals like snakes, mice, squirrels and hares; small birds like weavers and starlings; birds of prey like hawks and eagles, and many types of insects. All of these organisms interact to form the grassland ecosystem.
2. Choose one or two students in the class to be spiny mice. What do spiny mice (and all other animals) need from their habitat to survive? Most importantly, they need food, water and shelter. (Ask students, what kind of food do mice eat? For the most part, they are granivores, eating seeds of grass, wildflowers and weeds. The grasses also provide shelter for mice to build nests and hide from predators.) The rest of the class will start out as one of these key resources. Demonstrate the symbols for each resource. For food, both hands on your belly. For water, both hands covering your mouth. For shelter, hands in a circle above your head.
3. Have the habitat group line up on one side of the field, with the mice on the other side. At the start of each round, the groups start with their backs turned toward the other, and all students must decide on a resource symbol to make. The habitat is deciding which resource they represent, and mice are deciding which resource they’re seeking out. Once everybody has their symbol, count to three and have everybody turn around.
4. The mice race to find somebody matching the resource they’re seeking. With the mouse population so small, they should have no problem finding available resources. Once they’ve found their match, the two link arms and go back to the “mouse” side of the field; the mice are using these resources to increase their population size. Any mice who don’t find a match die; their bodies nourish the grass and they become resources for the next round.
5. Play as many rounds as you like, watching how the population of mice changes with the availability of resources. When resources are scarce, competition becomes much stronger and more mice die. On the large piece of paper, keep track of mice and resources at the beginning of each round.
6. After a few rounds, you might introduce predators into the ecosystem. Have one or two students become hawks who start the round in the middle of the field. If a mouse is tagged by a hawk, it becomes habitat for the next round. With more habitat available, it will be easier for mice to find resources, but they will have to run for their lives in the process!
7. At the end of the game, discuss what the students observed. Refer to the data you collected at the end of each round. How does a species’ population change over time? What are some of the things that influence resource availability? How do predators influence the food web?
4. Habitats of Kenya
Topic: The four main natural environments in Northern Kenya and the processes that cause these fertile environments to become desert.
Essential Question: What are the habitats in Northern Kenya and how can we conserve them to stop desertification?
Objective: Students will learn about the four main natural habitats in Northern Kenya, and will understand the definition and causes of desertification.
Background Information/Vocabulary:
Fertile: Land capable of producing abundant vegetables or crops
Deforestation: The action of clearing a wide area of trees
Desertification: The process by which fertile land becomes desert
Land reclamation: Restoring land that has been degraded by human activities
Materials Needed: One piece of white paper (8.5x11 or similar size) per student and one to use as an example, colored pencils, Planting the Trees of Kenya: The Story of Wangari Maathai, chalk and a large whiteboard space or chart paper and a marker.
Procedure:
1. Begin by introducing Wangari Maathai. Ask the class if anyone knows who Wangari Maathai is and have them share what they know with the class. Briefly summarize her life and work to prepare the class for the book.
• She was born in the Central Highlands of Kenya and went to school there until she received a scholarship to study at a University in America.
• She studied hard and became a Professor of Biology at the University of Nairobi.
• In 1977, she started the Green Belt Movement, encouraging people, especially women, to plant trees throughout Kenya. As of 2017, 51 million trees have been planted in conjunction with her efforts.
• In 2004 she won the Nobel Peace Prize, a very prestigious award for her efforts to reclaim the land in Kenya and her activism.
2. Read Planting the Trees of Kenya: The Story of Wangari Maathai. As you read, pause and ask the following questions:
• What does Wangari’s home environment look like on the first page of the book? What does it mean for the earth to be “clothed in its dress of green?”
• How has the environment changed in the illustrations when Wangari returns from America? What does it look like? What is gone?
• How does the environment begin to change again when Wangari and the other women start to plant trees?
3. Discuss the book:
• Why are trees important? Why did Wangari Maathai want to plant trees?
• Does the environment around this school look like the environment from the book before or after she started the Green Belt Movement?
• How are you participating in land reclamation in Kenya?
4. Transition to talking about habitats. Make a chart on the board like this:
5. Title the first column “Grassland/Savannah.” As the students what they know about this type of environment.
Grassland/
Savannah
6. Fill in the chart with information about this environment, but do not use the third row on the bottom- this will be used for desert. When students raise their hands to share what they know about each ecosystem, allow them to come up and add it to the charts.
• After you have made the chart with the four main habitats, talk about the term desertification. Define this term and ask what might cause this phenomenon.
• In the empty bottom row of the chart, write the definition of desertification. Then, make a list of factors that can cause desertification. This list may include overgrazing of sheep and goats, fires, deforestation, soil erosion, drought, and inappropriate agriculture
Your finished chart should look like this:
Grassland/
Savannah Woodland Forest Riverine
-A grassland is a large area of grasses, herbs, and flowers
-There are few trees in grasslands and savannahs because the soil is too fine and too dry to support trees
-There are also few plants and vegetation because large, grazing herbivores that live here keep the plants from growing very large
-Fires started by natural lightning also keep the trees down
Large grazing animals such as zebras and antelopes live here, as well as their predators, such as lions and cheetahs -A woodland is an area with a low density of trees that has plenty of sunlight and limited shade. This habitat is characterized by patches or clumps of trees, but is different from a forest because a forest has thick and consistent trees
-Contains an understory of shrubs and grasses
-Trees here are kept relatively short because of herbivores and fires
-A woodland is often a transition zone between grassland/savannah and forest habitats -Found on Mount Kenya and in the Aberdare forest
-Forests are usually located in the hills where it is cool and there is lots of water because of frequent rains
-With tall trees and plenty of leaves to eat, forests are home to many animals including monkeys, insects, and many insect-eating birds
-Trees here are dense and do not allow much sunlight through, so there is little understory growth
-Less than two percent of land in Kenya is covered by forests -The riverine is the habitat in and around a river
-These habitats have plenty of water because the river keeps the nearby soil moist
-Because of all this moisture, this habitat can support big trees, such as the “yellow fever tree” acacia in this area
-There is a large understory of shrubs and flowers
Deserts are usually located in areas of little rainfall, but with improper land management, fertile habitats can become desert
Desertification is the process by which fertile land becomes desert, typically as a result of drought, deforestation, or inappropriate agriculture.
• Some of the factors that cause desertification in Kenya are overgrazing of sheep, goats and cattle; forest; and deforestation.
7. Now, explain to the class that each student will be making a tri-fold brochure that shows each of these habitats. Show them the example brochures and go through how it is organized, showing that each panel is a different habitat and that the bottom is about desert.
8. Give each student a piece of white paper and tell them not to fold it yet. Once everyone has their paper, demonstrate how to fold it in front of them and guide them through the process, giving assistance if needed. Tell them that it does not have to be perfect!
9. Label each panel with the students step-by-step, going slowly to ensure that they put the habitats in the right places. Clearly show where to draw the line for desert.
10. Show the students that in each panel they will write the facts that you have written on the board. Then, underneath, they will draw a picture of that habitat.
• Optional: if you have a slideshow of photos, show this to them now to give them ideas about what to draw for each habitat. Every time a photo comes up, have the students identify what animal is in the photo (if any) and say what type of habitat it is.
11. Explain that the back panel of the brochure is an “About the Author” section. In this section, each student should draw a small picture and write a bit about
him or herself. Write a prompt on the board to get them started. The following is an example:
• My name is _____ and I am from ______. I am ____ years old and I am a student in Grade ___ at ______ School. My favorite subject in school is ______. My favorite things to do are ______ and ______. My favorite animal is ________. When I grow up, I want to be a ________.
Discussion/Extension: As students work on their brochures, ask them questions about what they are including. Ask students to include plants and animals that they think of themselves that were not included in the chart.
Assessment: Ask students to show you their work as you walk around to make sure that they are on the right track. Encourage students to be creative and use many colors, plants, and animals in their drawings.
Notes: The students may not finish making their brochures in the given class time. Tell them that they do not have to rush to finish; instead, assure them that they can finish during the week before the next club meeting, or give them more time during the next club meeting to finish.