Lesson 2: The Power of Wind
Jump To
Print this Page
Resources for This Lesson
Additional Resources
Objectives
- Students will learn the role wind plays and why it is important to Earth.
Background

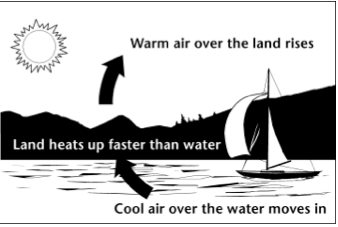
Wind is air in motion. It is caused by the uneven heating of Earth’s surface by the sun. Since Earth’s surface is made of very different types of land and water, it absorbs the sun’s heat at different rates. During the day, the air above the land heats up more quickly than the air over water. The warm air over the land expands and rises, and the heavier, cooler air rushes in to take its place, creating winds. At night, the winds are reversed because the air cools more rapidly over land than over water.
In the same way, the large atmospheric winds that circle Earth are created because the land near Earth’s equator is heated more by the sun than the land near the North and South Poles.
Wind is called a renewable energy source because the wind will blow as long as the sun shines.
Over 5,000 years ago, the ancient Egyptians used wind to sail ships on the Nile River. Later, people built windmills to grind wheat and other grains. The earliest known windmills were in Persia (Iran). These early windmills looked like large paddle wheels. Centuries later, the people of Holland improved the basic design of the windmill. They gave it propeller-type blades, still made with sails. Holland is famous for its windmills.
American colonists used windmills to grind wheat and corn, to pump water, and to cut wood at sawmills. As late as the 1920s, Americans used small windmills to generate electricity in rural areas without electric service. When power lines began to transport electricity to rural areas in the 1930s, local windmills were used less and less.
Materials
- Items collected either by students or teachers—some that can and cannot move by wind
- Notebooks
Preparation
A windy day would work well, but this also is possible in the classroom. You (or students) collect various items to test in the wind. (These could include feathers, rocks, leaves, grass.)
Procedure

Have students use all of their senses to describe wind in their notebooks. If it is a windy day, allow students to go outside. They can use what they already know and anything they observe. Can they see wind? Feel it? Smell it? Hear it? Taste it? How do we know it’s there? What evidence can they provide to support their descriptions of wind?
Ask the students, “What effect does wind have on different objects?” Ultimately, the students will discover, among other things, that wind can make things move. It affects animal behavior, and can even break things.
Create a chart in your journal of the items you collected. Have students make a hypothesis (prediction) of what will happen to each object in the wind. After all items are entered, begin testing each one. This may be outside on a windy day, or inside by blowing with their mouths or creating wind by fanning their notebooks. Have students record the effects of wind on each of the objects in their journals.
Example:
Object / Hypothesis (prediction) / Observation
Rock / will fly a couple inches / dropped straight down slowly
Feather / ____?___ / ____?____
Discussion
A. Seeds drift in the wind. This helps the seed to move away from the parent plant so that it can find enough space, light, and water to grow into a new plant (e.g., acacia seeds, grass seeds).
B. Many animals use the wind: Black kites, hawks, vultures, etc., ride the thermal updrafts created by air being heated and rising. Animals hide from the wind, but it also helps them. Wind can carry smells of a predator or prey.
Possible Questions
- Using wind, how far could you make one object go?
- What senses were involved in your observations: sight, hearing, touch, taste, smell?
- What does this experiment tell you about the wind?
- What other examples demonstrate the ability of wind to make things move?
- How would the Earth change if there were no wind?
Alternatives
1. Without talking, students act out their interpretation of wind. It could be a soft breezy day or a violent windy storm, any type of wind. Then the class can discuss the effects of different types of wind on the weather and environment (discuss good and bad effects).
2. Students can draw pictures of the wind. We really don’t see the wind, just its effects. Each student could represent it in their own way. Have students share. See what similarities and differences there are in student interpretations. Could it be that they are drawing a soft breeze or a violent storm, etc…?
3. Students can make pinwheels to see how wind energy can be used to do work. They can compare the pinwheels to windmills that are often used to pump water from the ground. Students can also make weather vanes to see how wind direction changes over time or how variable wind direction is at different places. Directions for making a weather vane are on Worksheet 1 under Resources.
