Lesson 1: The Water Cycle
Jump To
- Big Ideas
- Essential Questions
- Content Outcomes Addressed
- Standards Addressed
- Background
- Vocabulary
- Additional Resources:
- Pre- and Post-Assessment
- Misconceptions
- Investigation 1: Journey of a Water Droplet Game
- Investigation 2: Mini Water Cycle Ecosystems
- Investigation 3: Your Personal Water Usage Journal
- Extensions
Print this Page
Resources for This Lesson
Additional Resources
Big Ideas
- The water cycle is not a simple circle but a complicated, multi-step process.
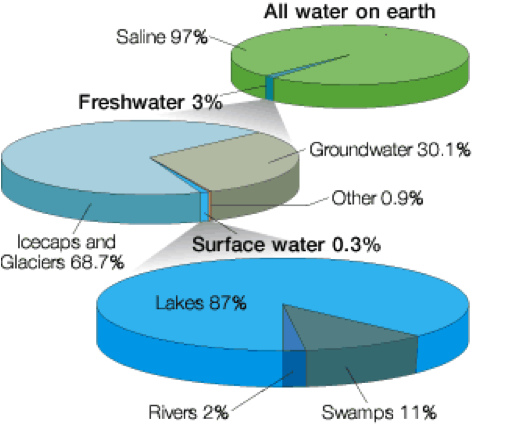
- Most of the water on Earth is not available for humans to drink.
- Humans must learn to conserve what little water they have access to if we want to build and maintain a comfortable style of life for all people.
Essential Questions
- What does the word “cycle” in the term “water cycle” actually mean?
- How much water is actually available for humans to use?
- What does it mean to “conserve” water?
Content Outcomes Addressed
- Students will be able to draw and describe the water cycle.
- Students will be able to define “usable water” and understand its quantity relative to all water on Earth.
- Students will be able to explain the importance of water conservation.
- Students will be able to evaluate and critique different models of the water cycle.
Standards Addressed
NGSS:
- Disciplinary Core Ideas: ESS2.A (3-5) (6-8) (9-12), ESS2.C (K-2) (3-5) (6-8) (9-12), ESS2.D (K-2) (3-5) (6-8), ESS3.C (K-2) (3-5) (9-12), LS2.B (3-5), PS3.D (K-2)
- Science and Engineering Practices: 1, 2, 3, 4, 5, 6, 7, 8
- Crosscutting Concepts: 4, 5, 7
CCSS: ELA/Literacy:
- Writing: W.K.2, W.1.2, W.2.2
- Speaking and Listening: SL.K.1, SL.K.2, SL.K.5, SL.K.6, SL.1.1, SL.1.2, SL.1.5, SL.1.6, SL.2.1, SL.2.2, SL.2.6, SL.3.2, SL.3.3, SL.3.6, SL.4.2, SL.4.3,SL.5.2, SL.5.3, SL.6.2, SL.7.2, SL.8.2
CCSS: Mathematics:
- Mathematical Practice: MP.4, MP.5
- Operations & Algebraic Thinking: 3.OA.7
National Geography Standards: 7, 15, 16
Background
Source: http://water.usgs.gov/edu/watercycle.html
The water cycle has no starting point. But, let’s begin with large bodies of water. The sun, which drives the water cycle, heats water. Some of it evaporates as vapor into the air. Evaporation rates increase as the temperature increases. (In fact, we sweat because the process of evaporation removes heat from the environment. Water evaporating from your skin cools you.) Rising air currents take the vapor up into the atmosphere, along with water evaporated from the soil and water transpired from plants. The combination of these two processes is what we call evapotranspiration. The vapor rises into the air where cooler temperatures cause it to condense into clouds. Air currents move clouds around the globe; cloud particles collide, grow, and fall out of the sky as precipitation. Some precipitation falls as rain. Some falls as snow and can accumulate as ice caps and glaciers, which can store frozen water for thousands of years. Snow packs in warmer climates often thaw and melt when spring arrives, and the melted water flows overland as snowmelt. Most precipitation falls into bodies of water or onto land where, due to gravity, the precipitation flows over the ground. Some soaks back into the soil and is used by plants to survive and grow. Some, especially water on bare ground, continues to flow as surface runoff. A portion of runoff enters rivers in valleys, with stream flow moving water toward larger bodies of water (even oceans). Runoff and groundwater seepage accumulate and are stored as freshwater in lakes. Not all runoff flows into lakes though. Much of it soaks into the ground. Some water infiltrates (seeps) deep into the ground and replenishes aquifers (porous subsurface rock that holds water), which store huge amounts of freshwater for long periods of time. Some infiltration stays close to the land surface and can seep back into bodies of surface water (and the ocean) as groundwater discharge, and some groundwater finds openings in Earth’s surface and emergesas freshwater springs.
It may sound as if all of the water is always moving. In fact, much more water is “in storage” for long periods of time than is actually moving through the water cycle.
Vocabulary
- evaporation: the process by which a substance changes from a liquid to a gas or vapor; the opposite of condensation
- condensation: the process by which a substance changes from a gas into a liquid; the opposite of evaporation
- precipitation: atmospheric water vapor that has condensed and falls to Earth due to gravity
- water cycle: a term that describes the movement of water in, on, and above Earth
- evapotranspiration: the combination of evaporation from the ground and transpiration from plants
- transpiration: process in plants by which water is carried through the stem to the leaves and evaporates into the air
- aquifer: a porous subsurface rock that holds water
Additional Resources:
Pre- and Post-Assessment
Assess prior knowledge by asking students to respond in writing and with pictures to the prompt, “Describe the water cycle.” Have students repeat this exercise after the unit of study.
Misconceptions
- The water cycle is a circle that each raindrop moves through continuously.
- Water droplets are constantly moving through the cycle.
- Water disappears when it evaporates.
- Water only evaporates from oceans and lakes.
- All water on Earth is in liquid form or clouds.
- Any freshwater can be used by humans.
Investigation 1: Journey of a Water Droplet Game
Source: http://files.dnr.state.mn.us/education_safety/education/project_wet/sample_activity.pdf
Focus Question
What are the different pathways a water drop can take through the water cycle?
Materials
- Large pieces of paper marking water cycle stations (places water can go) titled: Soil, Plant, River, Clouds, Ocean, Lake, Animal, Groundwater, Glacier
- 9 small boxes to be used as dice (for large groups, it is useful to have multiple sets of dice); these will represent 9 stations where a water drop can go on its journey through the water cycle.
- Markers
- Water Cycle Dice Labels (print out from Resources, above right)
- Journey of a Water Droplet Chart (print out from Resources, above right)
- A device for indicating time is up
Procedure
- Have the students draw the water cycle. Concentrate on including all the different pathways water can take on its journey through the water cycle.
- Ask students to share their water cycle drawings either in small groups or with the whole class.
- Make a list on the board of all of the places that water can go on its journey. The goal is to come up with the nine water stations listed on the large pieces of paper: Soil, Plant, River, Clouds, Ocean, Lake, Animal, Groundwater, Glacier. This may require some leading questions from the teacher.
- Spread the nine stations out around the room, matching each with its corresponding die. Then spread the students out as evenly as possible among the nine stations.
- Using the Water Cycle Dice Labels (printed from Resources), have the students label the sides of each die according to the instructions on the sheet.
- Give the students an allotted amount of time for the activity. (This may need to be adjusted depending on your student to dice ratio. The students should have enough time to get through at least eight stations.) At each station each student will roll the die and move to where it says to go. (If a student rolls “Stay,” he/she must roll again after the others at the station have rolled.) Students will also have to fill out the Journey of a Water Droplet chart (printed from Resources) before rolling the die at a new station.
- When time is up, come back together and discuss the results. For older students, you can have them do a data analysis by combining the data from all of the students’ journeys and looking at the percentage of time spent at each station.
Discussion Questions
- Were there any stations you didn’t visit? Were there stations you visited more than once?
- Did you get “stuck” at a particular station? Did you get “stuck” bouncing back and forth between two or three stations?
- Were there some stations that ended up having a lot of students at them?
- How does water move from one location to the next? What form does it most often move in?
Investigation 2: Mini Water Cycle Ecosystems
Note: This activity is bestdone over the course of a few days.
Focus Question
What are the factors that affect how water moves through an ecosystem?
Materials
- 4 small bowls
- 1 large bowl that does not let light in to cover one of the smaller bowls
- Salt
- Water
- Plastic wrap
- Something to stir with
- Notebooks
- Pencils/pens
- A sunny spot to leave the four bowls for a few days
- Any additional materials required by extensions
Procedure
- Ask the students, Where does water go when it evaporates? What are some factors that you think may affect the rate at which water evaporates?
- Prepare the four small bowls: Pour equal amounts of water into each bowl; securely cover the first with plastic wrap; leave the second uncovered; dissolve salt in the third; cover the fourth with the large, opaque bowl; place the four small bowls in a sunny spot.
- Alternative conditions: Clear large bowl; different colored plastic wrap; other things besides salt to dissolve in water; water plants, such as elodea; shady rather than sunny spot; let the students suggest other scenarios based on their ideas about the factors that affect evaporation.
- Ask the students to hypothesize in their notebooks what will happen to equal amounts of water under the different conditions.
- Over the course of a couple of days, have students record their observations in their notebooks, using drawings or words. Noticeable changes should include various rates of evaporation. Note that the salt solution should leave salt crystals after the water evaporates.
Discussion Questions
- Which scenario evaporated the most water?
- Which evaporated the least?
- Are there any factors that you can conclusively say affect evaporation? How?
Investigation 3: Your Personal Water Usage Journal
Focus Question
Do you conserve water as much as you could or should?
Materials
- Water Usage Data Sheet (print out from Resources, above right)
- Notebooks
- Pens/pencils
Procedure
- Have students make lists of all the ways they use water on a daily basis.
- Have students share what they came up with; start a list on the board, using prompting and guiding questions to complete the list with items students may not have thought of.
- Ask students how much water they think each of the activities on the list consumes on average. Give students time to think and to write down their answers.
- Have students start a journal that keeps track of the number of times they do each activity on the list. (This can be done for homework on a single night or over the course of a few days or a week.)
- Students should calculate how many gallons of water they are using each day on average.
Discussion Questions
- Were students surprised by the amount of water they use?
- Did this activity change the way students use water? How?
- Did it change the way students think about water? How?
- What are some things that students can do to help conserve water?
Extensions
1. Discuss the distribution Earth’s water
Of Earth’s total water supply, over 96 percent is saltwater, which is unfit for humans to drink. Of the total freshwater, over 68 percent is locked up in ice caps and glaciers. Another 30 percent of freshwater is in the ground. Fresh surface-water sources, such as rivers, lakes, and swap, only constitute about 1/150th of one percent of all Earth’s water. Yet, rivers and lakes are the sources of most of the water people use everyday.

2. Water Cycle Readers’ Theater
Print out the script from the Resources section (above right) and assign ten students to read the various parts. No props or scenery is necessary.
3. Rainfall around the world
Look at and compare maps of rainfall around the world.
4. The American dust bowl
Study the American dust bowl in connection with an English or History class.